Hello All,
I hope you are doing well and good.
I hope you are doing well and good.
Introduction:
This article demonstrates how to mask phone number filed like XXX-XXX-XXXX using Xamarin Forms Behaviors concept.
Prerequisites:- Windows or Mac machine
- Visual Studio has to be installed in it
- Virtual device or real device for both Android and iOS platforms to run and observe an application.
Agenda:
- How to create a Xamarin Forms Project
- What is Behavior?
- How to create Behavior?
- How to mask phone number using Behavior?
How to create a Xamarin Forms Project?
- In the Start screen, launch Visual Studio. This opens the start page:

- In Visual Studio, click Create new project... to create a new project:

- In the New project window, click Cross-Platform from left pane, select the Mobile App (Xamarin.Forms) template, set the Name and Solution name to PhoneNumberMask , choose a suitable location for the project and click the OK button:

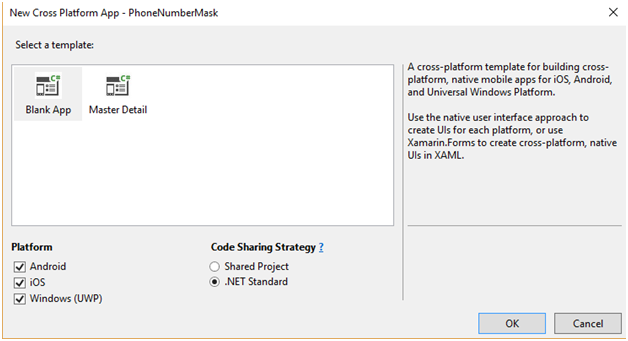
- In the New Cross-Platform App dialog, click Blank App, select .NET Standard as the Code Sharing Strategy, and click the OK button:
- In Solution Explorer, the PhoneNumberMask project will be displayed like below

What is Behavior?
Ø Behaviors allow us to add functionality to User Interface controls without creating the subclass for it. Instead, the functionality is implemented in behaviour class and attached to the control.
Ø Behaviors are written in the code and added to controls in XAML or code in code behind page.
How to create Behavior?
The process of creating a Xamarin.Forms behaviour is as follows.
- Create a class that inherits from the Behavior or Behavior<T> class, where T is the type of the control to which the behavior should apply.
- Override the OnAttachedTo method to perform any required setup.
- Override the OnDetachingFrom method to perform any required cleanup.
- Implement the core functionality of the behavior.
- Right click on PCL/NET Standard (PhoneNumberMask) project and select Add and then click on Class as shown in below diagram.

- Then Add New Item windows will open like below.

In above window, I have named a class “PhoneNumberMaskBehavior” and then click on Add button.
- Class will be created as shown in below.
using System;
using System.Collections.Generic;
using System.Text;
namespace PhoneNumberMask
{
class PhoneNumberMaskBehavior
{
}
}
Replace above class with following code
using System;
using System.Collections.Generic;
using System.Text;
using Xamarin.Forms;
namespace PhoneNumberMask
{
public class PhoneNumberMaskBehavior : Behavior<Entry>
{
public static PhoneNumberMaskBehavior Instance = new PhoneNumberMaskBehavior();
///
/// Attaches when the page is first created.
///
protected override void OnAttachedTo(Entry entry)
{
entry.TextChanged += OnEntryTextChanged;
base.OnAttachedTo(entry);
}
///
/// Detaches when the page is destroyed.
///
protected override void OnDetachingFrom(Entry entry)
{
entry.TextChanged -= OnEntryTextChanged;
base.OnDetachingFrom(entry);
}
private void OnEntryTextChanged(object sender, TextChangedEventArgs args)
{
if (!string.IsNullOrWhiteSpace(args.NewTextValue))
{
// If the new value is longer than the old value, the user is
if (args.OldTextValue != null && args.NewTextValue.Length < args.OldTextValue.Length)
return;
var value = args.NewTextValue;
if (value.Length == 3)
{
((Entry)sender).Text += "-";
return;
}
if (value.Length == 7)
{
((Entry)sender).Text += "-";
return;
}
((Entry)sender).Text = args.NewTextValue;
}
}
}
}
- Similarly, create one more behavior to set Maximum length for phone number as below.
using Xamarin.Forms;
namespace PhoneNumberMask
{
public class EntryLengthValidator : Behavior<Entry>
{
public int MaxLength { get; set; }
public int MinLength { get; set; } = 0;
protected override void OnAttachedTo(Entry bindable)
{
base.OnAttachedTo(bindable);
bindable.TextChanged += OnEntryTextChanged;
}
protected override void OnDetachingFrom(Entry bindable)
{
base.OnDetachingFrom(bindable);
bindable.TextChanged -= OnEntryTextChanged;
}
void OnEntryTextChanged(object sender, TextChangedEventArgs e)
{
var entry = (Entry)sender;
// if Entry text is longer than valid length
if (entry.Text.Length > this.MaxLength)
{
string entryText = entry.Text;
entryText = entryText.Remove(entryText.Length - 1); // remove last char
entry.Text = entryText;
}
if (MinLength > 0)
if (entry.Text.Length < this.MinLength)
{
((Entry)sender).TextColor = Color.Red;
}
else
((Entry)sender).TextColor = Color.Black;
}
}
}
- Open MainPage.xaml, paste the following code in it.
<?xml version="1.0" encoding="utf-8" ?>
<ContentPage xmlns="http://xamarin.com/schemas/2014/forms"
xmlns:x="http://schemas.microsoft.com/winfx/2009/xaml"
xmlns:behavior="clr-namespace:PhoneNumberMask"
x:Class="PhoneNumberMask.MainPage">
<StackLayout HorizontalOptions="Fill"
VerticalOptions="Fill"
Padding="5,20,5,5">
<Label Text="Phone Number Formatting"
FontAttributes="Bold"
FontSize="Medium"></Label>
<Entry Text="{Binding Phone}" Keyboard="Telephone">
<Entry.Behaviors>
<behavior:PhoneNumberMaskBehavior x:Name="PhoneMask" />
<behavior:EntryLengthValidator MaxLength="12"/>
</Entry.Behaviors>
</Entry>
</StackLayout>
</ContentPage>
- Now set either Android or iOS project as start-up project and run the application. You will see the output like below.

When I try to enter the phone number in Entry box shown in above screen, it has displayed like below.

Summary:
To display the phone number in XXX-XXX-XXXX format, I have used two behaviors for the Entry control defined in MainPage.xaml.
They are:
- EntryLengthValidator : To allow maximum number of characters.
- PhoneNumberMaskBehavior : To mask the phone number in XXX-XXX-XXXX format


No comments:
Post a Comment